In the previous article, we saw how to initialize a new Eleventy project from scratch and add plugins. Now we'll build our mini-blog project using templates.
This simple example, with code available for download (see link below), will help you understand the fundamental concepts of an Eleventy project:
- The project structure
- Image and style management
- Template inheritance
- Adding metadata in YAML frontmatter
- The project configuration file
What Will Our Blog Look Like?
Our simplified blog will consist of the following pages:
- A homepage displaying the list of articles, showing each article's title, summary, and publication date
- Individual article pages
- An "About" page
Here's a preview of the mobile homepage:
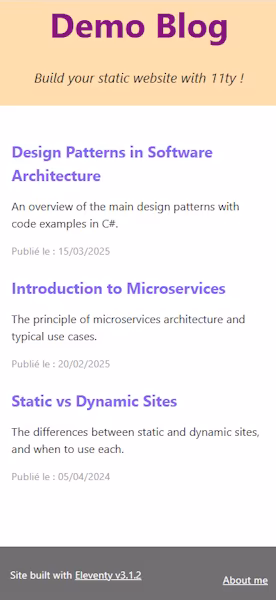
Every page will include:
- A header containing the site title (which also serves as a link back to the homepage)
- A variable page body
- A footer with links to the Eleventy website and the "About" page
Note
The source code for this project is available in this GitHub repository.
The Three Types of Project Sources
The project sources consist of files used to generate the final HTML pages of the site. They fall into three categories:
Template files use a templating language and can include YAML metadata along with HTML, CSS, and JavaScript code. There are two types of templates:
- Layout templates that define a common layout and content for other templates. These are created using advanced templating languages like Nunjucks or Liquid that allow embedding external data and components.
- Final page templates. For content-heavy pages without complex layouts (like blog articles), Markdown is the most practical choice as it's very simple and allows using external editors like Obsidian for maximum editing comfort.
Data files typically contain site metadata (title, tagline, deployment URL, author description, etc.) or data shared across multiple templates.
Image files are used to illustrate pages. In the previous article, we saw how the @11ty/eleventy-img plugin makes it easy to handle encoding, sizing, and lazy loading of images.
Project Organization
Folder and File Structure
Here's an example of how to organize the different types of files in the project:
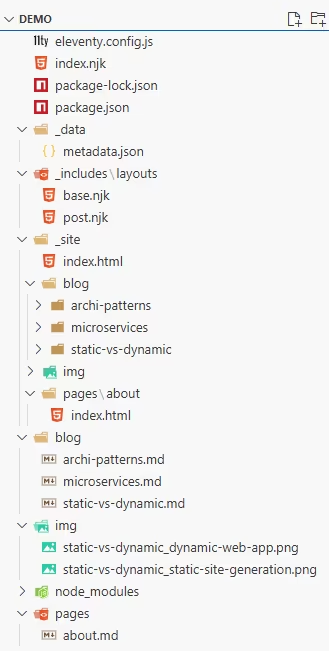
Note: The folder and file icons/colors are automatically defined by the vscode-icons plugin in VS Code.
At the project root, you'll find the configuration file, package list files, and the homepage (index.njk). All other files are organized in the following folders:
| Folder | Contents |
|---|---|
| _data | Data files |
| _includes\layouts | Layout templates |
| _site | Final files generated by Eleventy from the sources |
| blog | Blog articles (Markdown files) |
| img | Images |
| node_modules | Packages used by Eleventy |
| pages | General site pages (excluding the homepage) |
Note
All folder names beginning with an underscore are default names used by Eleventy. You can choose different names, but they must then be specified in the configuration file.
The _includes folder contains files used in other templates: layout templates, components, CSS files, etc. You can organize its contents into subfolders like layouts, components, and css for better clarity.
The blog, img, and pages folders aren't mandatory but help keep the project organized.
Image Management
Centralizing images in an img folder offers two major advantages:
- It allows sharing images across multiple pages. This is particularly useful for multilingual blogs, for example.
- You can reference images using site-root-relative paths. This way, when you rename or move pages, you don't risk breaking links to the images they contain.
However, when creating a blog where article images aren't shared between articles, this centralization makes it harder to see which images belong to which articles. Here's a workaround:
Tip
By prefixing each image name with the article's name (=URL), all images for the same article appear next to each other in the img folder. This makes it easy to see which images belong to which articles. Plus, descriptive names help with SEO.
Here's an example of image names from my blog:
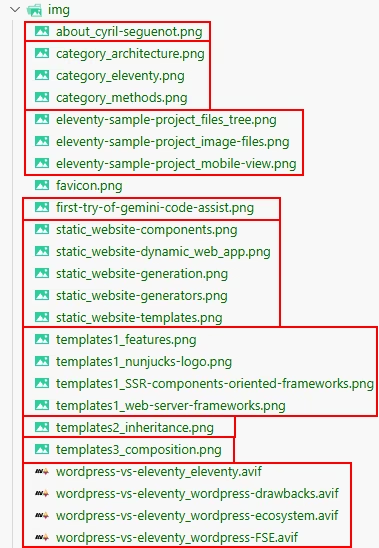
Each group represents an article or page.
Each image name follows the format article-url_image-name.ext. If an article only has one image, you can omit the image name.
Tip
As we saw in the previous article, the @eleventy-img plugin can automatically encode all images as AVIF to substantially reduce their size and handle lazy loading. At first, I was manually encoding my PNGs as AVIF in Paint.Net, but I realized Eleventy's plugin was much faster, so now I let it handle it, saving me lots of time 😊.
Style Management
There are several more or less complex ways to manage styles in an Eleventy project. My preferred method, which works well for moderately sized CSS code, is to embed CSS in <style> tags within template files. This means:
- Global styles that apply to the entire site go in the base template base.njk, which all site pages inherit from.
- Article-specific styles are in the post.njk template
- Page-specific styles are in the relevant pages.
This logic is inspired by component-based architectures. It's very intuitive (you know instinctively where to place different styles), avoids conflicts, and simplifies code maintenance and onboarding.
Note
There are no CSS files in our file structure because all styles are embedded in templates. I haven't included the CSS code in this article's code snippets as it would be too verbose, but I strongly encourage you to download the sources and examine the CSS structure.
Output Folder
The _site folder contains the final site files for deployment. Its contents partially mirror the source structure, including the blog, img, and pages folders:
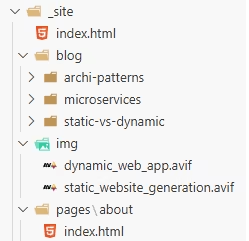
The blog and pages folders contain one subfolder per site page, except for index.html which remains at the root. Eleventy follows the W3C recommended convention of placing each page in a folder containing an index file along with any page-specific image, CSS, or JavaScript files.
In our example, the subfolders only contain index.html files because images are centralized in the img folder and styles are centralized in the templates.
Tip
This W3C convention avoids direct links to final files. Each page is accessible via a URL ending with the folder name (e.g., https://develegant.com/pages/about/), and the server automatically serves the index.* file it finds in that folder. This allows changing the index file's extension without affecting its URL.
Templates
Base Template
To define the site's general layout (header, body, and footer), we create the template _includes/layouts/base.njk (the extension refers to Nunjucks) with the following content:
<!doctype html>
<html lang="{{ metadata.language }}">
	<head>
		<meta charset="utf-8">
		<meta name="viewport" content="width=device-width, initial-scale=1.0">
		<title>{{ metadata.title }}</title>
		<meta name="description" content="{{ description or metadata.description }}">
<style>
...
</style>
	</head>
	<body>
		<header id="titleBar">
         <h1 id="siteTitle"><a href="/">{{ metadata.title }}</a></h1>
         <p id="slogan">{{ metadata.slogan }}</p>
		</header>
		<main>
			{{ content | safe }}
		</main>
		<footer>
			<p>Site built with <a href="https://www.11ty.dev/">{{ eleventy.generator }}</a></p>
         <p><a href="/pages/about">About me</a></p>
		</footer>
	</body>
</html>
The `` syntax is template syntax that retrieves the title metadata from the _data/metadata.json file, which contains:
{
	"title": "Demo Blog",
	"slogan": "Build your static website with 11ty !",
	"language": "fr",
	"url": "https://localhost:8080",
	"author": {
		"name": "Cyril Seguenot",
		"email": "contact@develegant.com"
	}
}
The line `` refers to the content of the page using this template. For example, the homepage and "About" page templates that use this base template will each inject their specific content in place of this line.
The safe flag simply indicates this content is safe and doesn't need special character escaping.
Inherited Layouts
Template inheritance, which I covered in detail in this article, is a powerful technique for creating layout hierarchies. By having the post.njk layout inherit from the base.njk layout, we can add article-specific elements while inheriting the base layout.
Here's an excerpt from this template's code:
---
layout: layouts/base.njk
---
<style>
	/* Article-specific styles */
</style>
<article>
  <header>
    <h1>{{ title }}</h1>
    {% if page.date %}
    <p class="post-meta">
      Published on <time datetime="{{ page.date.toISOString() }}">{{ page.date.toLocaleDateString() }}</time>
    </p>
    {% endif %}
   </header>
  {{ content | safe }}
</article>
The first three lines form the YAML frontmatter. This is where we declare that the template inherits its layout from the base template.
Note
Note that Eleventy automatically looks for layouts in the _includes folder. This is why we specify a path relative to that folder.
The inheritance syntax shown above isn't specific to Nunjucks but is Eleventy's own. By using YAML frontmatter, Eleventy provides a consistent syntax that works across templating languages, including those like Markdown that don't natively implement inheritance.
Final Templates
At the end of the template chain are the blog articles and general site pages. These files also include YAML frontmatter.
Here's the frontmatter for an example article:
---
layout: layouts/post.njk
title: Static vs Dynamic Sites
description: The differences between static and dynamic sites, and when to use each.
date: 2025-08-05
---
We first declare the layout file to use, then define the article's metadata: its title, short description, and publication date.
Eleventy automatically collects this data and stores it in an in-memory collection. We can then retrieve it to display article excerpts on the homepage.
And here's the frontmatter for the About page:
---
layout: layouts/base.njk
title: About
---
Now let's look at the homepage template, the index.njk file at the site root:
---
layout: layouts/base.njk
---
<style>
   /* Page-specific styles */
</style>
<ul class="post-list">
   {%- for post in collections.posts -%}
   <li class="post-list-item">
      <a href="{{ post.url }}" class="post-list-link">{{ post.data.title }}</a>
      <p>{{ post.data.description }}</p>
      <div class="post-list-meta">
         Published on: <time datetime="{{ post.data.date.toISOString() }}">{{ post.data.date.toLocaleDateString() }}</time>
      </div>
   </li>
   {%- endfor -%}
</ul>
collections.posts represents the collection of articles. It's declared in the configuration file, as we'll see shortly. This collection provides access to article metadata through the data property. This lets us retrieve the title, description, and date of articles declared in their YAML frontmatter.
Article Navigation
Here's the code used in post.njk to create "Previous" and "Next" article links at the bottom of each article:
{% set prevnextPosts = collections.posts | getPrevNext(page.url) %}
{% if prevnextPosts.prev or prevnextPosts.next %}
<nav class="post-navigation">
  <div>
    {% if prevnextPosts.prev %}
      <a href="{{ prevnextPosts.prev.url }}">
        <span>Previous post</span>
        <strong>{{ prevnextPosts.prev.data.title }}</strong>
      </a>
    {% endif %}
  </div>
  <div class="post-navigation-next">
    {% if prevnextPosts.next %}
      <a href="{{ prevnextPosts.next.url }}">
        <span>Next post</span>
        <strong>{{ prevnextPosts.next.data.title }}</strong>
      </a>
    {% endif %}
  </div>
</nav>
{% endif %}
The first line applies a getPrevNext filter (see definition below) to the article collection to retrieve both the previous and next articles. We pass the current article's URL as a parameter to the filter, and store the filter's result in a prevnextPosts variable that provides access to the previous and next articles if they exist.
page is a variable automatically populated by Eleventy that refers to the current page. It represents a large object containing all the page's properties and content, including the data property which holds its metadata.
The Configuration File
An Eleventy project must include an eleventy.config.js file that describes its configuration. This is essentially Eleventy's nerve center. It contains:
- Special folder names if you're not using the defaults (_data, _includes, _site)
- Plugin imports and their configuration, as we saw in the previous article
- Custom filter functions usable in templates
- Object collection declarations (e.g., blog article collections)
- And other project-specific settings
Here's the configuration file code for our example:
// Import functions of external libraries
import { eleventyImageTransformPlugin } from "@11ty/eleventy-img";
import path from "node:path";

// Core configuration function of 11ty
export default async function (eleventyConfig) {
	// --- ADD PLUGINS and configure it ---

	// Config for the @11ty/eleventy-img plugin
	eleventyConfig.addPlugin(eleventyImageTransformPlugin, {
		// see previous article
	});

	// --- FILTERS ---

	// Returns articles preceding and following the url passed as parameter
	eleventyConfig.addFilter("getPrevNext", (collection, url) => {
		const pageIndex = collection.findIndex(item => item.url === url);

		if (pageIndex === -1)
			return { prev: null, next: null };

		// The collection is sorted from most recent to oldest.
		// "next" is the element with a lower index (most recent).
		// "prev" is the element with a higher (older) index.
		const next = pageIndex > 0 ? collection[pageIndex - 1] : null;
		const prev = pageIndex < collection.length - 1 ? collection[pageIndex + 1] : null;

		return { prev, next };
	});

	// --- COLLECTIONS ---

	// Collection of articles built from the Markdown files stored in the "blog" folder
	eleventyConfig.addCollection("posts", function (collectionApi) {
		const posts = collectionApi.getFilteredByGlob("./blog/*.md").sort((a, b) => b.date - a.date);
		//console.log(posts.length, "articles");
		return posts;
	});

	// --- CONFIGURATION OF TEMPLATES ENGINES ---
	return {
		dataDeepMerge: true,
		// Pre-process *.md files with: (default: `liquid`)
		markdownTemplateEngine: "njk",
		// Pre-process *.html files with: (default: `liquid`)
		htmlTemplateEngine: "njk",
		templateFormats: ["md", "njk", "html"],
	};
};
We already covered the beginning of the file and the image plugin configuration in the previous article, so I won't revisit that here.
In the FILTERS section, the configuration object's addFilter method lets you declare a custom filter function usable in templates to extract or transform information from pages or collections.
Here we create a getPrevNext filter that extracts and returns the articles immediately before and after the article whose URL is passed as a parameter, following the collection's article order. This filter lets us build the "Previous article" and "Next article" links shown at the bottom of each article (see above).
In the COLLECTIONS section, we create the article collection (named posts) using the addCollection method. We use an object passed as a parameter and automatically populated by Eleventy, which provides access to the collection management API. We use this API to create a collection (an array) from the Markdown files in the blog folder, then sort this array by descending date (date read from each article's frontmatter).
Note: In the "./blog/*.md" syntax, the dot refers to the current folder, in this case the site root folder. It's mandatory, though I don't know why.
Finally, the TEMPLATE ENGINES CONFIGURATION section specifies which template engines to use. Note that Eleventy allows embedding Nunjucks or other advanced templating languages in Markdown. So we need to specify which template engine to use first on these files before it interprets the Markdown.
templateFormats also specifies which file extensions Eleventy should process. In this case, it will process all ".md, .njk, .html" files.
Note
This means you can include Nunjucks instructions in ".html" files. However, the ".njk" extension makes it clear that the file contains Nunjucks code.
Building the Site
Once all source files are created, you can build the site locally. To do this, use the command created in the previous article. In VS Code's terminal opened to the project root folder, run npm run start.
If everything goes well, you'll see this output:
PS S:\Code\Eleventy\Demo> npm run start

> demo@1.0.0 start
> npx @11ty/eleventy --serve --quiet

[11ty] Wrote 5 files in 0.22 seconds (v3.1.2)
[11ty] Watching…
[11ty] Server at http://localhost:8080/
Eleventy indicates it wrote 5 files in 0.22s. These are the index.html files for the homepage, "About" page, and the 3 blog articles that appear in the _site subfolders.
Eleventy then tells us the site is available at http://localhost:8080/. Pressing CTRL + click on this URL opens the site in your default browser.
Important
When the site is generated this way, images aren't generated immediately but rather on-demand when requested by the browser, to reduce initial build time. To verify that AVIF images are properly generated from source images, you need to run npm run build and check the contents of the _site/img folder.
As long as Eleventy's built-in HTTP server is active, any changes to source files trigger a complete rebuild of the site. This is useful for debugging, but before modifying a group of files, it's better to stop the server (CTRL+C in the terminal) and restart it afterward with npm run start.
Warning
When you rename or delete source files, the files generated from these sources in _site aren't deleted. You'll need to delete them manually before rebuilding the site. The simplest approach is to delete the entire _site folder and let Eleventy regenerate it.
Conclusion
By carefully reading this article and studying the example project's source code, you can save significant time and effort while mastering Eleventy's fundamentals, because the official documentation isn't necessarily the best place to start.
You'll still have plenty more to discover to fully leverage Eleventy's potential, and this takes time and patience—like anything truly worthwhile 😉.
For my part, I don't regret spending a few weeks mastering Eleventy to create my blog (even if I occasionally grumbled about the documentation 😌), because the results were absolutely worth it. I learned almost everything by starting with examples, then doing lots of experimentation and taking extensive notes. This is the method that works best for me.
I'll continue sharing my Eleventy knowledge on this blog, so feel free to check back weekly to keep learning!
If you found this tutorial helpful, please leave a comment to help with its search ranking. And if you think it could help others, don't hesitate to share it!